

Work in plain text
After you connect, you don’t need to memorize the tool catalogue to make progress. In your IDE chat, describe what you want in plain text. The assistant selects and calls the matching MCP tools. For example:- Create a connector project for organization A against organization B.
- Upload this OpenAPI file as the source specification.
- Suggest endpoint mappings and show me what still needs approval.
- Approve the pending operation mappings I just reviewed.
- Generate JOLT for the approved routes, then prepare a pull request.
Mapping decisions stay with you. The server never approves an endpoint mapping, a route target, or a property mapping on your behalf. On most clients, including Cursor, read the matching
data://pending_* resource, review it in chat, then tell the assistant to call the matching decide_* tool. If your client renders Prefab or MCP-UI, you can use the review widgets instead.What you can do from your IDE
You can build a complete connector without the web interface. From your IDE, discover organizations, upload specifications, match endpoints, and approve mappings. You can scaffold routes, generate JOLT or XSLT transformations, publish a GitHub pull request, and generate the SDK or the connector. The web interface is an optional parallel surface. Connector Studio stores your mappings and transformations on the platform. Through the mapping and transformation phases, the catalogue lives in Connector Studio only. Your IDE usually holdscs-context.json for MCP session rebind unless you or the assistant wrote files locally. Phase 7 (get_connector_scaffold_plan) is when Grand Central-standard connector files appear in your IDE workspace. Publishing a GitHub pull request is a step you take explicitly at the end. Connector Studio doesn’t sync your repository continuously.
If you want to generate, scaffold, bootstrap, or migrate a connector, call start_project_generation on the same connection. Then call get_project_generation_status to learn the next action.
Where catalogue state lives
The following table compares what you see in Grand Central with what lives in your IDE workspace at each stage:
The connector-studio backend git repository is not your connector project. Open the project in Grand Central Connectors, or call
get_project_summary for a web link.
Enable Connector Studio MCP
Before you configure your IDE, install Connector Studio MCP from the Marketplace:1
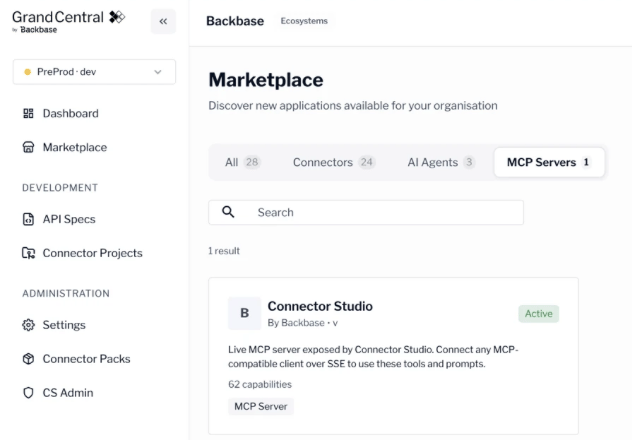
Open the Marketplace
Sign in to Grand Central, select your installation, then open Development > Marketplace > MCP Servers.
2
Install Connector Studio MCP
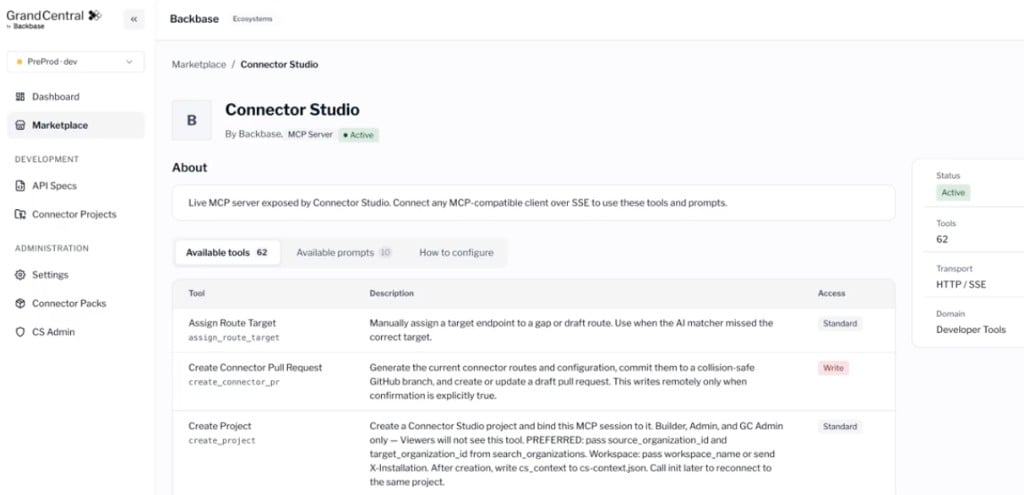
Find Connector Studio and select Cursor or VS Code, depending on your IDE.
X-Installation header from MCP Setup before you can connect.
Get your connection details
Connector Studio MCP is shared for each runtime, such as Dev or PreProd. TheX-Installation header and the path prefix of your Grand Central URL together select your installation.
1
Open MCP Setup
Sign in to Grand Central, select your installation, then open MCP Connection Setup, for example at
/your-installation/mcp-setup.2
Wait for the configuration to load
Wait until Client Configuration appears. The page lists the Available Tools and Available Prompts that the server reports.
3
Check the snippet
Confirm that the snippet includes both an
Authorization: Token … header and an X-Installation header.For a standard catalogue connection, confirm that Available Tools includes start_project_generation, continue_project_generation, get_project_generation_status, and decide_operation_mapping.X-Installation header in the snippet.
Install the server in your client
Prerequisites
Before you install, make sure you have the following:- A Microsoft sign-in to Grand Central.
- An MCP client that supports remote HTTP or server-sent events (SSE) transport, not only local stdio servers. The following clients work:
- Cursor, which supports a one-click install link.
- VS Code with MCP support or Copilot Chat.
- Claude Desktop 1.0 or later, which needs manual JSON configuration.
Option A: Install in Cursor with one click
On the MCP Setup page, select the one-click install link. Cursor fills in the server URL, the server name, and the headers, includingX-Installation.
Option B: Configure Cursor or Claude Desktop by hand
Add the exact block from MCP Setup to~/.cursor/mcp.json or to claude_desktop_config.json, then replace YOUR_TOKEN with the token from that page.
The block has the following shape. Your own URL, server name, and installation slug come from MCP Setup:
X-Installation header.
Option C: Configure VS Code
Where MCP Setup offers a VS Code install link, select it. Otherwise, paste the server block into your VS Code MCP configuration, as the Microsoft MCP documentation describes.Verify the connection
1
Restart your client
Restart Cursor, VS Code, or Claude Desktop, then confirm that the server appears in the MCP server list.
2
Check your identity
In your IDE chat, ask the assistant to call
who_am_i. The response confirms your authentication and user context.3
Check the session
Ask the assistant to call
get_session_status. The response confirms that no project is bound to the session yet.X-Installation header is missing, generate a new token on MCP Setup and update your configuration.
After you verify the connection, return to Work in plain text. Describe the next outcome you want in chat so the matching MCP tools run.
How MCP sessions work
Bind a session to a project
Most tools need an MCP session that is bound to a connector project. The following table describes the tools that manage this binding:
After
create_project or init succeeds, the response includes a cs_context object. Save it as cs-context.json in your repository.
The saved cs_context blob is for MCP session rebind (context_id, project_id, project and organization names). It is not an OpenAPI specification, mapping export, or connector code. Connector catalogue state lives in Connector Studio. If you lose cs-context.json, call init with project_id, exact project_name, or git_url. Approved mappings are not lost.
To reconnect later, call init with cs-context.json or with the project_id.
How installations and workspaces apply
- The
X-Installationheader is required on every MCP HTTP request. It selects the workspace catalogue for your installation, and MCP has no default. - The
inittool also accepts an exactworkspace_name. If you send both values, they must resolve to the same installation. - Vendor specifications and projects follow the workspace catalogue. MCP doesn’t create a separate private catalogue for each developer.
Upload a specification
1
Start the upload
Call
start_spec_upload to get an upload target.2
Post the file
Send an authenticated multipart POST request, using the same
Authorization headers as your MCP configuration.3
Wait for the result
Call
get_upload_job with the task_id and a wait_seconds value, such as 30.Review and decide
You approve every mapping yourself, and you can do it entirely on MCP without the web interface. On most clients, including Cursor, read the matchingdata://pending_* resource, review it in chat, then tell the assistant to call the matching decide_* tool. If your client renders Prefab or MCP-UI, you can use the review widgets instead.
The following table lists the resource and tool for each review stage:
To find out which step comes next, call
get_mapping_resources. It returns mapping_status.review_guidance, which names the recommended_next_tool, the pending_resource, and the decide_tool. decide_* responses are compact. Read data://pending_* for the full queue.
Choose a workflow
The following table describes which MCP prompt or path to use for your situation:
In Cursor, start with the
new_connector_guide prompt on MCP Setup under Available Prompts. Optional parameters include source_spec_name and target_organization. Prefer plain-text goals in chat when you’re unsure which prompt to pick. The assistant can call start_project_generation and follow get_project_generation_status.
Tool and phase reference
Use this section when you need exact tool names. The following table summarizes the flow for a new connector. For UI equivalents, see Map endpoints and fields, Transformations and generated code, and Design routes with Route Builder.
Practical constraints:
- Don’t proceed past phase 1 until
source_specsis non-empty. There is noset_target_spectool. Target specifications bind in phase 2 throughtarget_spec_idsongenerate_target_candidates. - Don’t skip route target linking (phase 4b). Unlinked routes produce empty transforms in phase 6.
- Poll
get_mapping_resourcesuntil endpoint or schema mapping finishes before you open the matching review. Opening review too early shows zero attributes. - Completing phase 6 means the catalogue is ready in Connector Studio. Phase 7 materializes Grand Central-standard files locally through
get_connector_scaffold_plan(mode="complete"). Continue only whenstatus="ready"andmaterializable=true. Callprepare_connector_prbeforecreate_connector_pr.
Generate a connector in one step
To generate, scaffold, bootstrap, or migrate a connector, callstart_project_generation on the same connection instead of working through each phase by hand. Then poll get_project_generation_status and use continue_project_generation or provide_generation_input when the status reports a blocker.
The server resolves SDK versus connector goals and catalogue versus brownfield strategies. When catalogue data is insufficient, brownfield bootstrap may apply if bounded source files are present. When scope or evidence is missing, the status returns structured action_required instead of guessed files.
Related topics
- Connector Studio overview
- Get started with Connector Studio
- Map endpoints and fields
- Transformations and generated code
- Design routes with Route Builder
- Connector Studio glossary, which defines the MCP terms used on this page